Hinzufügen eines Einsenders und Genehmiger zum Einreichungsworkflow
Ziel
So fügen Sie einen Einreicher und einen Genehmigenden zum Einreichungs-Workflow für eine Einreichung hinzu.
Hintergrund
Beim Erstellen oder Bearbeiten einer Einreichung können Sie einem Einreichungs-Workflow zwei (2) Arten von Personen (auch „Rollen“ genannt) hinzufügen:
- Einreicher
- Genehmiger
Ein Genehmiger bestimmt die Personen, die die Einreichung genehmigen müssen, bevor die Arbeit fortgesetzt werden kann. In der Regel gibt es mehrere Genehmigende für einen Einreichungs-Workflow und Mitglieder des Planungsteams (z. B. Architekt, Projektingenieur, Statiker usw.).
Wichtige Hinweise
- Erforderliche Benutzerberechtigungen:
- So fügen Sie dem Einreichungs-Workflow für eine von Ihnen erstellte Einreichung Benutzer hinzu:
- Berechtigungen der Stufe "Nur Lesen" oder "Standard" für das Einreichungen-Tool des Projekts mit der granularen Berechtigung "Einreichung erstellen" in Ihrer Berechtigungsvorlage aktiviert.
ODER - Berechtigungen der Stufe „Standard“ für das Einreichungen-Tool des Projekts ohne eine Ihnen zugewiesene Berechtigungsvorlage.
Hinweis: Ohne die Berechtigungen der Stufe "Admin" für das Einreichungen-Tool des Projekts können Sie nur Benutzer mit der Berechtigung der Stufe "Admin" für das Einreichungen-Tool des Projekts zum Einreichungs-Workflow hinzufügen.
- Berechtigungen der Stufe "Nur Lesen" oder "Standard" für das Einreichungen-Tool des Projekts mit der granularen Berechtigung "Einreichung erstellen" in Ihrer Berechtigungsvorlage aktiviert.
- So fügen Sie Benutzer zum Einreichungs-Workflow für eine Einreichung hinzu, die Sie nicht erstellt haben:
- Berechtigungen der Stufe "Standard" für das Einreichungen-Tool des Projekts werden als Einreichungs-Manager
- So fügen Sie Benutzer zum Einreichungs-Workflow für eine beliebige Einreichung hinzu:
- Berechtigungen der Stufe "Admin" für das Einreichungen-Tool des Projekts.
Hinweis: Mit Berechtigungen der Stufe "Admin" für das Einreichungen-Tool des Projekts können Sie alle Benutzer mit der Berechtigung der Sufe "Standard" oder höher für das Einreichungen-Tool des Projekts zum Einreichungs-Workflow hinzufügen.
- Berechtigungen der Stufe "Admin" für das Einreichungen-Tool des Projekts.
- So fügen Sie dem Einreichungs-Workflow für eine von Ihnen erstellte Einreichung Benutzer hinzu:
- Zusätzliche Informationen:
- Wenn Ihr Unternehmen plant, einen Einreicher von einem anderen Unternehmen zur Einreichung hinzuzufügen, empfehlen wir, dass Sie immer einen Einreichungs-Manager als ersten Genehmigenden im sequentiellen Genehmigungsworkflow der Einreichung bestimmen. Dies gibt dem Einreichungs-Manager die Möglichkeit, sicherzustellen, dass die Einreichu von Ihrem internen Team gründlich geprüft wird, bevor sie an die nachfolgenden Genehmiger (d. h. das Planungsteam) im Einreichungs-Workflow weitergeleitet wird.
Schritte
- Anwenden einer Einreichungs-Workflow-Vorlage auf eine Einreichung
- Hinzufügen von Benutzern zum Einreichungs-Workflow
Anwenden einer Einreichungs-Workflow-Vorlage auf eine Einreichung
A user with 'Admin' level permission to your project's Submittals tool can create one (1) or more submittal workflow templates which you can then to a new submittal when you first create it. This saves data-entry time by preventing you from having to add a new submittal workflow each time you create a submittal.
- Under Submittal Workflow, do the following:
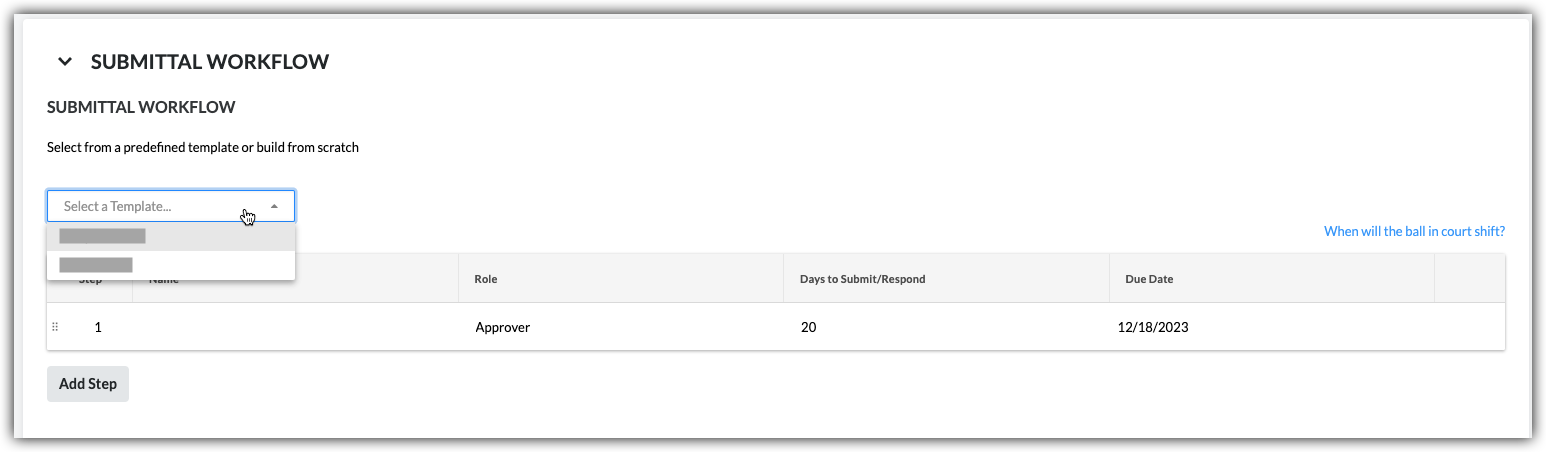
- Select a Template. Select a workflow template from the drop-down list.
Notes:- This drop-down list is only visible and available to users with 'Admin' level permission on the Submittals tool.
- This action applies the person(s) named on the submittal workflow template to your submittal.
- To learn how submittal workflow templates are created, see Manage Submittal Workflow Templates.
- Select a Template. Select a workflow template from the drop-down list.
- Continue by modifying the Name, Role, and Days to Submit/Response fields as needed for the submittal. Your changes only affect the workflow on the submittal, your changes do NOT affect the submittal workflow template.
- (Optional) Continue with the steps in Add Users to the Submittal Workflow.
Hinzufügen von Benutzern zum Einreichungs-Workflow
- Under Submittal Workflow, do the following for each desired line item in the submittal:
- Name. Start typing a project user's name in the Search box. Then select the appropriate user from the list.
- If you want to require a response from the user, place a mark in the checkbox next to their name.
OR - If you do NOT want to require a response from the user, remove the mark from the checkbox.
Note: If you are adding more than one user to a parallel approval workflow group, the Ball In Court Responsibility will shift to the next workflow group after all of the people marked required in the group submit a response to the submittal.
- If you want to require a response from the user, place a mark in the checkbox next to their name.
- Role. Select Approver or Submitter from the list. See What is the difference between a submitter and approver in submittals?
Notes:- To be designated as an approver, the person must exist in the Project level Directory tool (see Add a User Account to the Project Directory) and must also be granted 'Admin' or 'Standard' level permissions to the Submittals tool (see Set User Permissions for the Submittals Tool).
- If you are a user with 'Standard' level permissions to the Submittals tool, you can only add users with 'Admin' level permissions to the workflow.
- If you plan to add a Submitter to the submittal, we recommend that you designate a Submittal Manager as the first approver in the submittal's sequential approval workflow. This gives the Submittal Manager an opportunity to ensure the submittal is thoroughly reviewed by your internal stakeholder before it is sent to the users in the next step on the submittal workflow.
- If you are a user with 'Admin' level permissions to the Submittals tool, you can add users with either 'Admin' or 'Standard' level permissions to the workflow.
Note: If you want the submittal workflow to use sequential approval, add only one user to each line item in the workflow. If you want a step in the submittal workflow to use parallel approval, add two or more users to a line item.
- Due Date. Select a date from the calendar for the submittal response to be due.
Note: The 'Due Date' field is automatically populated based on the default number of days specified on the Submittals tool's Configure Settings page. See Configure Settings: Submittals Tool. The due date also respects which days are set as 'working days' for the project. See Set Project Working Days.
- Name. Start typing a project user's name in the Search box. Then select the appropriate user from the list.
- Click Add Step.
- Repeat these steps to add another user to the workflow.
- If you want to change the order of the workflow steps, do the following:
- Grab the line item by the vertical grip (⋮⋮).
- Use a drag-and-drop operation to move the line item into the desired order.

Siehe auch
If you would like to learn more about Procore's submittals management software and how it can help your business, please visit our construction submittals software product page  .
.