Ziel
So erstellen Sie eine Übermittlung mit dem Übermittlungstool des Projekts.
Hintergrund
Mit dem Übertragungstool des Projekts können Sie einen Datensatz mit Projektinformationen erstellen, die per Fax und Versandkanälen an andere gesendet wurden. Wenn Sie eine Übertragung erstellen und eine Kopie davon per E-Mail an Ihre Empfänger senden, werden alle Informationen erfasst und mit Ihrem Procore-Projekt gespeichert, einschließlich der Namen des Absenders, des Empfängers und aller relevanten Daten. Vielleicht ist beispielsweise das E-Mail-System eines Benutzers ausgefallen und die einzige Möglichkeit, eine offizielle Antwort zu senden, ist per Fax oder Telefon. In solchen Fällen möchten Sie eine Übermittlung erstellen, um die Korrespondenz zu verfolgen, damit für Prüfzwecke in Procore ein Verlaufsprotokoll verfügbar ist.
Wichtige Hinweise
- Erforderliche Benutzerberechtigungen:
- Um eine Übermittlung zu erstellen, Berechtigungen auf der Ebene "Standard" oder "Administrator" im Übermittlungstool des Projekts.
- Um in die Felder "An" oder "Cc" einer Übermittlung aufgenommen zu werden, muss der Benutzer zum Projektverzeichnis hinzugefügt werden. Siehe Hinzufügen eines Benutzerkontos zum Projektverzeichnis.
Schritte
Eine Übermittlung erstellen
- Navigieren Sie zum Übermittlungstool des Projekts.
- Klicken Sie auf Erstellen.

- Fahren Sie mit diesen Schritten fort:
Allgemeine Informationen zur Übermittlung hinzufügen
- Blättern Sie zu Allgemeine Informationen.
- Vervollständigen Sie die Dateneingabe wie folgt:
-
Number: Procore automatically assigns numbers to new transmittals in sequential order. You may change this number as desired.
-
Subject: A descriptive subject for the transmittal.
-
To: Select people or distribution groups from the project's Directory. This action assigns the transmittal to the named individuals. If you choose to click the Create and Email button (or 'Save and Email' if you are an 'Admin' user editing an existing transmittal), the system will automatically email a notification about the transmittal to the recipients.
-
CC: Select people or distribution groups from the project's Directory. This action carbon copies the transmittal to the named individuals. If you choose to click the Create and Email button (or 'Save and Email' if you are an 'Admin' user editing an existing transmittal), the system will automatically email a notification about the transmittal to the recipients.
-
Sent Via: Select Attached to attach an item from Procore to the transmittal or Under Separate Cover. If you select Under Separate Cover, you can also select one of these options: Email, US Mail, Hand Delivery, FedEx, UPS, DHL, Express Mail, Fax, and Other.
-
Private: Mark this checkbox to hide the transmittal from everyone except 'Admin' level users, designated users in the 'To' and 'Cc' fields, and members of the default distribution group (see Configure Advanced Settings: Transmittals).
-
Submitted For: Mark the checkboxes that correspond to the reason the transmittal is being submitted. You have these choices: Approval, Your Use, As Requested, Review and Comment, or Further Processing.
-
Action as Noted: Mark the checkboxes that correspond to the desired action. You have these choices: Out for Signature, Approved as Submitted, Approved as Noted, Submit, Resubmitted, Returned, Returned for Corrections, Resubmit, Due By, Received, Received as Noted, and Sent Date. (Note: It is recommended that you work with your project's management to define the proper use for each of these default actions in your environment).
- Fahren Sie fort mit Elemente zur Übermittlung hinzufügen.
Posten zur Übermittlung hinzufügen
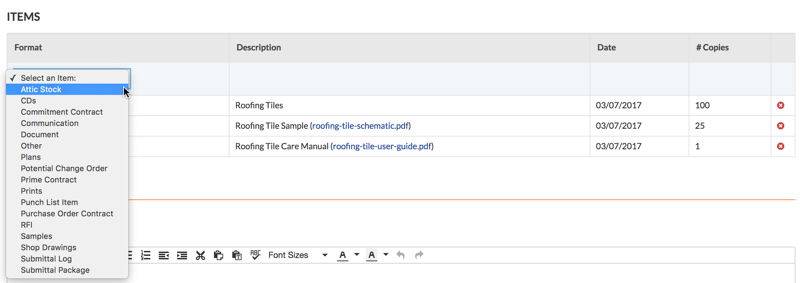
- Scrollen Sie auf der Seite Neue Übermittlung nach unten zum Bereich Posten.
- Wählen Sie einen Posten aus der Dropdown-Liste Format aus.
Anmerkungen:
- Sie können einer Übermittlung mehrere Posten hinzufügen.
- Wenn Sie Elemente zu einer Übermittlung hinzufügen, können Sie mehrere Dateien gleichzeitig für diese Formate anhängen: Dokumente, Pläne, Drucke, Muster und Werkstattzeichnungen. Siehe Wie hänge ich mehrere Dateien gleichzeitig an eine Übermittlung an?
Je nachdem, welche Procore-Tools in Ihrer Umgebung aktiviert sind, haben Sie möglicherweise die folgenden Möglichkeiten:
-
Attic Stock: Select this option to create a transmittal for any attic stock Then enter a description, select a date from the calendar, and enter the number of copies.
-
CDs: Select this option to create a transmittal for a compact disc. Then enter a description, select a date from the calendar, and enter the number of copies.
-
Commitment Contract: Select this option to create a transmittal for subcontract (see Create a Subcontract). Next, select a subcontract from the Description list, the date of the subcontract is captured automatically, and then enter a number of copies.
-
Communication: Select this option to create a transmittal for an email message in the project's Emails tool.
-
Document: When you select this option, the system prompts you to select a document from the project's Documents tool.
-
Other: To create a different type of submittal, select this option. Then enter a description, select a date from the calendar, and enter a number of copies.
-
Plans: Select this option to create a transmittal for any construction plans. Then enter a description, attach any files to the item, select a date from the calendar, and enter a number of copies.
-
Potential Change Order: When you select this option, the system prompts you to select a potential change order from the project's Prime Contracts tool.
-
Prime Contract: When you select this option, the system prompts you to select a contract line item from the project's Prime Contracts tool.
-
Prints: Select this option to create a transmittal for prints. Next, enter a description of the print(s), attach a file of the print, select a date from the calendar, and enter a number of copies.
-
Punch List Item: When you select this option, the system prompts you to select a punch list item from the project's Punch List tool.
-
Purchase Order Contract: Select this option to create a transmittal for a purchase order (see Create a Purchase Order). Then select a purchase order from the Description list, the system sets the date automatically, and enter a number of copies.
-
RFI: When you select this option, the system prompts you to select an RFI from the project's RFIs tool.
-
Samples: Select this option to create a transmittal for a sample. Then type a description of the sample, attach a file to the item, select a date from the calendar, and enter a number of copies.
-
Shop Drawings: Select this option to create a transmittal for shop drawing. Then type a description of the shop drawing, attach a file to the item, select a date from the calendar, and enter a number of copies.
-
Submittal Log: Select this option to create a transmittal for a submittal. Then select a submittal from the Description list and specify the number of copies.
-
Submittal Package: When you select this option, the system prompts you to select a submittal package from the project's Submittals tool.
- Klicken Sie auf Hinzufügen.
Hinweis: Wenn Sie mehrere Dateien an die Übermittlung angehängt haben, wird jede Datei als separater Einzelposten hinzugefügt.
- Wiederholen Sie die obigen Schritte, um weitere Einzelpositionen hinzuzufügen.
Die folgende Abbildung zeigt Ihnen ein Beispiel für einen Bereich für abgeschlossene Elemente.
Hinweis: Das System erlaubt es Ihnen NICHT, vorhandene Posten zu bearbeiten. Wenn Sie ein Element korrigieren müssen, klicken Sie auf das ROTE 'x', um es zu löschen. Fügen Sie dann den Artikel erneut hinzu.

- Fahren Sie fort mit Kommentare zur Übermittlung hinzufügen.
Kommentare zur Übermittlung hinzufügen
- Scrollen Sie auf der Seite Neue Übermittlung zum Bereich Kommentare.
- Geben Sie zusätzliche Informationen zur Übermittlung in das Feld Kommentare ein.
- Fahren Sie fort mit Erstellen oder Erstellen und Senden der Übermittlung.
Erstellen oder erstellen und senden Sie die Übermittlung
- Scrollen Sie zum Ende der Seite Neue Übermittlung.
- Wählen Sie aus diesen Optionen:
- Um die Übermittlung zu erstellen, ohne eine E-Mail an die in den Feldern „An“ und „Cc“ aufgeführten Personen zu senden, klicken Sie auf Erstellen.
ODER
- Um die Übermittlung zu erstellen und eine E-Mail-Benachrichtigung an die in den Feldern „An“ und „Cc“ aufgeführten Personen zu senden, klicken Sie auf Erstellen und E-Mail.
Hinweise: Nachdem eine Übermittlung erstellt wurde, macht das System die Registerkarten verwandte Posten, E-Mails und Änderungsverlauf sichtbar. Die Registerkarte E-Mails bietet Benutzern die Möglichkeit, eine Übermittlung an andere Projektteammitglieder weiterzuleiten. Siehe Weiterleiten einer Übermittlung per E-Mail.